I’ve been teaching winter photography workshops since 2006 and I’ve seen it all. I’ve watched as people lost footing and fell. I’ve seen broken tripods, cameras and lenses. I’ve seen filters break — including my loaners — and I’ve broken my own filters and shutter releases from falling. I’ve watched as people slid towards Lake Superior. One person tossed me his tripod and camera as he was going down and somehow I grabbed them before they hit the ground. Then just minutes after that fall, another person went down in the same place. I’ve heard horror stories from other photographers who fell on the ice next to Lake Superior or on an icy trail. A friend of mine, also a pro photog, fell once and it cost him $500 in damaged equipment. Most of those falls occurred because the person was not wearing the proper footwear. Winter traction devices, devices which attach to your shoes to give you extra traction on snow and ice, help prevent falls such as these. In winter, you need to wear these devices to stay upright. They should be as common as winter coats. While no traction device will prevent all falls, there are huge differences in winter traction devices. Some work better than others.
Over the years, I’ve seen dozens of styles of these mini-crampons and this article is my winter traction device review.
Yaktrax WALK, Yaktrax PRO and Similar Winter Traction Devices

Yaktrax or Yaktax knockoffs are the most popular devices that I see on my photography workshops. Out of the Yaktrax line there are three styles and two of them are NOT suitable for any situation other than flat and even snow-covered terrain. Please, reread that sentence, because as many times as I state it, it gets ignored. Why? Because Yaktrax WALK and PRO are easy to find. Almost every hardware or sporting goods store carries them. Yaktrax are also cheap. You can find them for as cheap as $12 online. Knockoffs can be even cheaper.
The three common varieties are the standard Yaktrax Walk (cheapest and most popular and worst! for our needs), Yaktrax Pros (also not suited for what we do) and Yaktrax ETR Extremes (good for what we do). Here’s how Yaktrax describes them:
The Yaktrax WALK is the original Yaktrax design. It was created for people who walk across icy parking lots, sidewalks, or are simply walking their dog. It is a great way to stay safe if you are a pedestrian or elderly. It is simple to put on and take off and you hardly know you have it on your shoes.
The Yaktrax PRO is designed for someone who spends more time outdoors during the winter. For example: a mail carrier, runner, or someone who faces winter conditions on a frequent basis. Police officers, athletes, trainers, and many other professionals use the Pro.
If you prefer to take your outdoor adventure off-road during the winter months, the Yaktrax XTR is for you. The XTR will grip into snow and ice with its durable spikes and chains. Featuring flexible toe and heel plates, your winter excursion won’t stop because of packed snow.
From what I’ve seen on my photo workshops over the years is that the standard Yaktrax WALK come off boots easily. I’ve seen many lost while trekking up frozen river canyons. They also don’t have enough traction to keep people on their feet on the slopped shores near Lake Superior. The Yaktrax PRO with the velcro overstrap stays on slightly better. Both these work okay as far as traction on flat, snow-covered terrain, but they do NOT provide any traction on ice. And as an outdoor photographer in winter, you want to be on that ice, because that’s where the best pictures are made.
The other problem with the WALK and PRO version is that the coil that is wrapped around the plastic/rubber of the product actually wears through the plastic/rubber in about a year of typical use that a photographer is going to put these through.
There are lots of other brands in this category, and they all look similar. I recommend that you only use these for flat, snow-covered terrain and not on ice. These are not really designed for photographers, so stay away from them.
STABILicers Lite Walker, ALPS Ice Grips, DryGuy GripOns and Others

The next step up in winter traction devices include the STABILicers Walk, the Kahtoola NANOspikes, the ALPS Ice Grips, the DryGuy GripOns and many others. There are about as many brands playing in this field as there are Yaktrax knockoffs. Instead of a coil around plastic, these use small spikes. You basically put them on the same way as the Yaktrax. The molded plastic fits over and hugs your shoe. The bottom of these are plastic or rubber or a combination and little spikes stick out of the bottoms.
These work well on snow and they work okay on flat ice. Once the ice starts to slope, like it does along Lake Superior’s shore, these devices start to skid down the ice. The ones that don’t have a Vecro strap over the top tend to come off when hiking on snow, so consider adding one to any that you buy.
I recommend these with reservation. They are a huge step up from Yaktrax WALK and PRO and the knockoffs, but there are many better devices on the market.
Yaktrax ETR Extremes and Kahtoola Microspikes

Among my favorite winter traction devices are the Yaktrax ETR Extremes and Kahtoola Microspikes. These are a great upgrade over the previous devices, but they cost two to three times as much. You’ll pay about $40 (online) for the Yaktrax and $60 (online) for the Kahtoola. The Kahtoola are slightly beefier. If you surf Amazon long enough, you can find cheaper knockoffs, such as these Glacier Chains GSC that run $20 or the IMAGE® 2x Anti-slip Trekking Shoe Chain for $13. You can also find other brands that are knockoffs, such as Hillsound Trail Crampon. It’s worth shopping around, because although the Microspikes are the most common, they don’t have the longest teeth. For example, the Hillsound Trail Crampon has a tooth that’s 0.6cm longer. I haven’t seen any of the knockoffs in person, so I’m not sure how they would hold up.
On this variety, the rubber body wraps around your boot. From the rubber, chains wrap around the sole of your boot and attach to spikes. The Kahtoola offers beefier spikes, but the Yaktrax offers anti-balling plates. The anti-balling plates help prevent snow from balling up on the bottom of your boot when the snow is sticky.
The weak point where I’ve seen them break is at the connection between the chain and the rubber connectors. I’ve seen one break on one of my workshops (and it was a bummer), but for the most part these seem to hold up well.
As far as traction: they provide a lot of traction, even on slightly slopped ice. For moderately slopped ice or steep ice, I’d move up a level, but these are a lot of bang for the buck and would suit many photographer’s needs. If you like to be able to get close to the big lake and into unique and hard-to-reach locations or if you want extra security and traction on the ice, you should consider stepping up to crampons (see below).
StabilICERS Maxx Ice Cleats

An interesting option is Stabilicers Maxx Ice Cleats. This is an interesting winter traction device. It has a stiff sole that completely covers the sole of your boot and stays in place with Velcro straps. These generally stay on your foot and if they come off, they’re still attached to your leg. They work well until the shore starts to get steep at which point they skid. They’re just about as good as the Kahtoola Microspikes and the Yaktrax XTR without the rubber connector that can rip out.
One downside/upside to the Stabilicers is that the spikes are replaceable — they’re sheet metal screws. They do tend to fall out, especially the front ones under your toes. You can easily replace these with any sheet metal screws that you can buy for a few cents at the hardware store.
If you wear soft winter boots such as Steger Mukluks, a super warm and popular boot in Minnesota and the rest of The North, this is your best option. They fit extremely well on all the muks, except for the wider arctic varieties. The other style of devices don’t fit well over muks.
Neo Overboots and StabilIcers Overboots

Using the same cleat system and the StabilIcer Maxx, the Neo StabilIcer overboots and the StabilIcer Overboots add a waterproof cover that you can pull over your shoes or hiking boots. These add protection from water, warmth in the insulated versions and traction.
The traction is the same as the StabilIcer Maxx, but the extra features may make this style attractive to someone who doesn’t own winter boots. One downside is the extra weight and they may be too warm for the warmer winter days. I have a friend who swears by his Neo overboots as the best footwear for winter.
Kahtoola Hiking Crampons
Kahtoola makes several models of hiking crampons, but Kahtoola’s K-10 Hiking Crampon is the most common model. These feature a metal base and large spikes. The metal base attaches to your feet using nylon webbing and quick release side buckles.
The Kahtoola Hiking Crampons are awesome. They work almost as well as mountaineering crampons (and are easier to put on) and you can pretty much go anywhere except the steepest ice shelves. They grip the ice, so you feel like you can walk anywhere. In fact, unlike some of the other winter traction devices, you won’t even be able to skate across a flat section of ice no matter how hard you try. These are solid.

For photographers used to the front points of a mountaineering crampon, you’ll miss them. But these are easier to get on than a mountaineering crampon, and because they lack the front points, you’re less likely to rip your pant leg — something that I’ve done multiple times when wearing mountaineering crampons.
Although these run $99, they’re worth it. They give you the best traction, best security from slipping, and work well even on angled ice. If you want a more comfortable, more durable version and a lighter version, consider the Kahtoola KTS in steel or aluminum. They feature 1 inch vs. 3/4 inch spikes and work with Kahtoola’s anti-balling plates (a worthwhile addition). The KTS cost few more bucks, but that money spent is a worthwhile upgrade to a device that’s going to last you many years. The ability to add the anti-balling plates (KTS Snow Release Skins) makes the cost of the upgrade worth it alone.
There are many competitors on the market as well. An interesting example is Hillsound’s Trail Crampon Pro. It uses ratchet straps to hold the crampon onto your shoe. Usually, the competitors have the more aggressive front points found of typical 10 point crampons. That’s the case with the Hillsound, but the boot overhangs the front points, so they’re not as effective as mountaineering crampons.
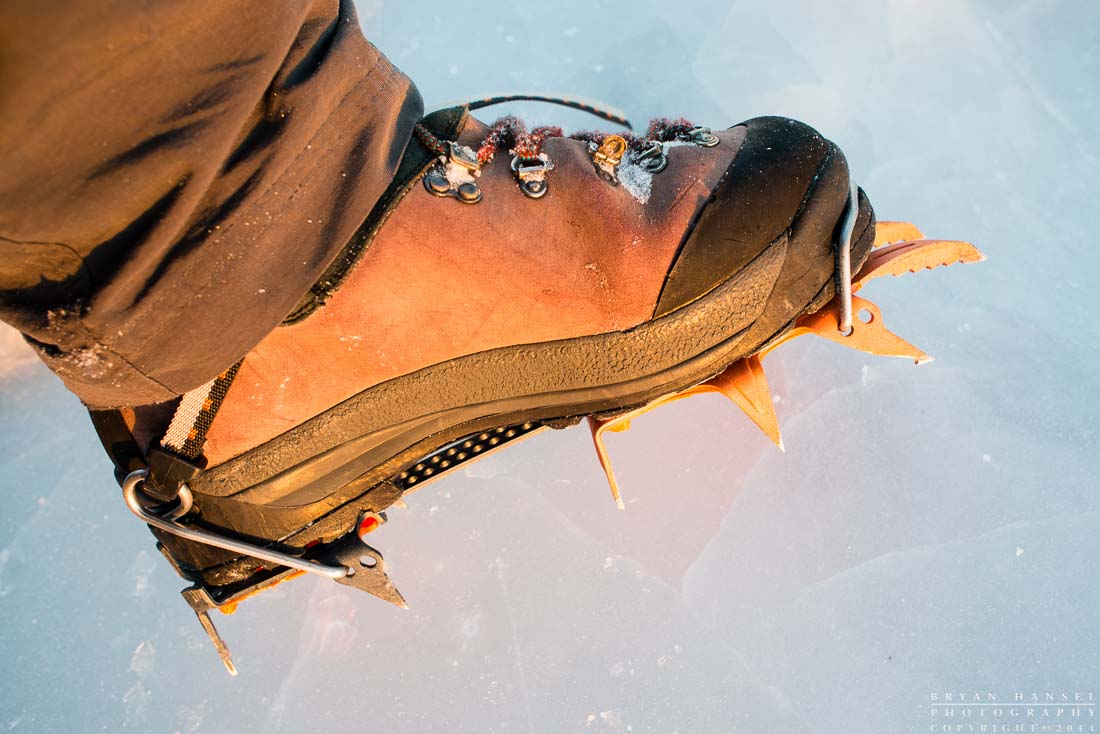
Mountaineering Crampons
While mountaineering crampons are probably overkill for most photographers unless you’re going into the mountains, they are a viable option and work well on steep ice. They feel completely secure on ice and allow you to go pretty much anywhere that you’re brave (or stupid) enough to go.

Crampons come in several varieties. The least expensive, such as the Camp Stalker, strap onto any style of shoe or boot. More technical varieties are designed to fit into the heel and toe groves on mountaineering boots. A popular technical crampon is the Petzl Sarken (I own and use these as my primary winter traction devices for photography along Lake Superior). The Sarken comes in a variety of attachment systems and includes the anti-balling plates. They also flex enough that they’re comfortable enough for walking around in.
I personally like the combination of my Boreal Asan mountaineering boots and crampons, because my boots are super warm and keep my feet warm when the temps reach -30, and I know that my crampons will keep me sticking on the ice. Although I have crampons that work better for vertical ice, I have used these to climb icefalls, so I know they’ll get me where I want to go along Lake Superior.
Unless you have aspirations to travel in snow and ice covered mountains, mountaineering crampons are probably overkill. But if you want to stick to anything and be able to go up or down steeper ice, there’s nothing that can replace their effectiveness.


Conclusion
There are many different styles of ice cleats and winter traction devices. I’ve described the most common styles that I see people bringing to my photography workshops. There are other styles, but for photographers the ones that I’ve outlined here seem to work the best. If I had to pick two styles to recommend, I’d pick either the Kahtoola Microspikes or Kahtoola’s K-10 Hiking Crampons. My personal inclination would be the go with the later and upgrade to the Kahtoola KTS version.
I hope this primer/review helps and if you have any questions, please, ask away.
Leave a Reply