May was a busy travel month for me. I spent much of the month out west photographing the Black Hills, Badlands National Park and Theodore Roosevelt National Park. While in the later, I ran into a few situations where I want to show a big sun rising or setting over the terrain of the park. That’s hard to pull off and requires careful processing. In this newsletter, I’ll write about processing for setting or rising sun photos.
Processing For Setting or Rising Sun Photos
If you’ve been to one of my photography workshops, you probably tried and learned the expose to the right exposure method. Using this exposure method, you adjust your exposure until the histogram just touches the right hand side (shooting RAW, you can usually go past the right hand side, but experiment to see how far before you try this on an important shot). The right hand side of the histogram represents the brightest pixels in your image. If you get a spike on the right hand side, you lost details, i.e. blew out the highlights. Go to the right and avoid the spike. For an example, see this histogram:

The resulting shot is this one. The right hand spike on the above histogram is the sun, which is completely blown out. It’s impossible with today’s cameras to get detail on the surface of the sun and still be able to pull details out of the dark shadows in the picture. I decided that I could blow out the sun, but I wanted to make sure that the bright clouds just above the sun still had detail.

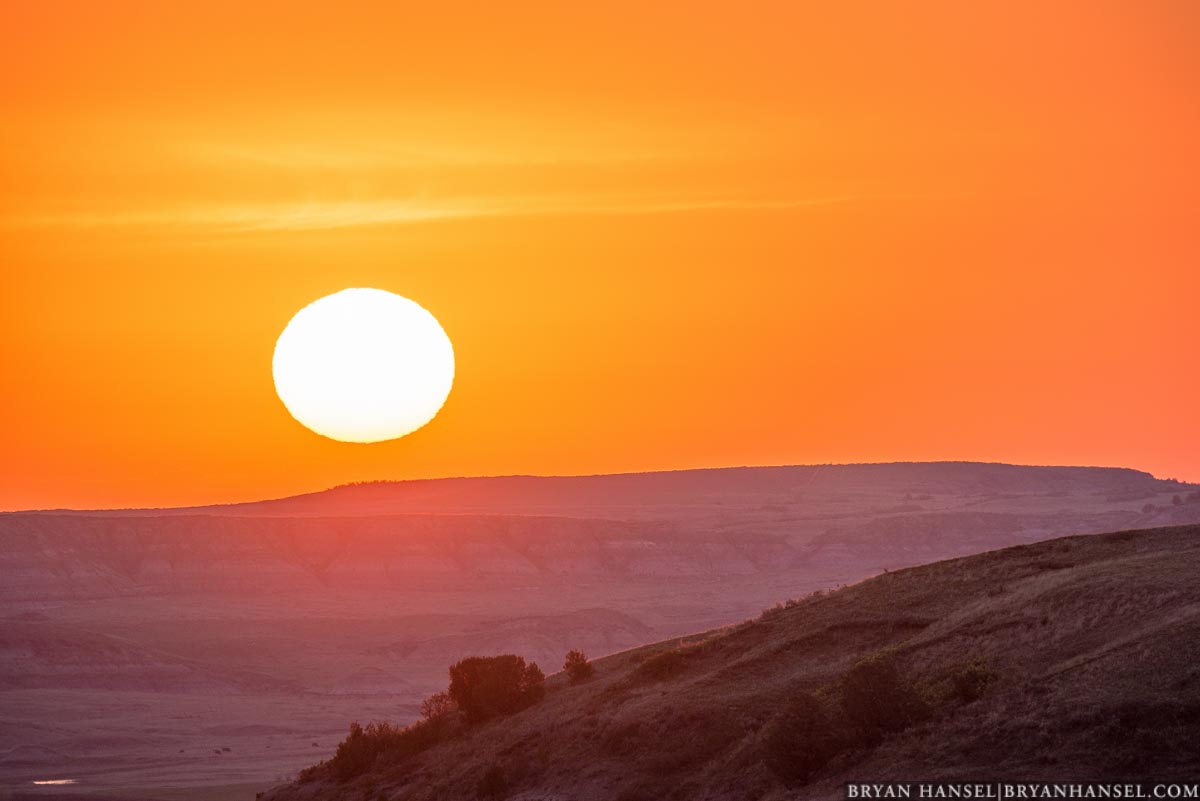
This picture seems really dark and you can’t see anything in the ground. There’s actually a big valley below and hills. To process this image, I needed to do something to brighten up that valley otherwise the image would be just a graphical representation of sunrise without any location clues.
I imported the image into Adobe Lightroom and made a few basic adjustments. See below.

The change in the exposure by +1.08 brightens the entire image which starts to bring out the valley, but also made the sky brighter and look more like I saw it. By doing that, I ended up blowing out the clouds. They looked terrible. So, I dialed in -50 in highlights, which darkened just the brightest parts of the photo. This brought back the detail in the clouds and kept them from overexposing.
I still wanted more detail in the valley, so I moved the Shadow slider to +100. This brightened up the valley and made it look like Teddy Roosevelt National Park. If you look closely at the full-sized image, you can just make out a few bison feeding in the valley below.
I wanted to bring out just a little more brightness in the brightest parts of the clouds, so I dialed the Whites to +23.
The steps I took removed some of the contrast in the image, so I added +10 in Contrast and +23 in Clarity. Then I remembered that it seemed slightly more vibrant to my eyes, so I adjusted the Vibrance by +12.
These simple steps brought out the details that you can see in the picture below. Not all cameras are going to be able to hold up to this type of editing (JPEG files will not hold up to this type of editing), but many of the latest generation can hold up to substantial editing like this. The key is to make sure that the image data is in the file. If it is, you might be able to bring it out. This is why exposing to the right is so important and it is one of the reasons that I teach it and make sure the students understand it.

The final edit isn’t exactly what my eyes saw, but there are important differences between what you make in photography and what our eyes see. One difference is that with our eyes we see a large slice of reality; photos are only an illusion of reality and that illusion is only a smaller slice of the slice that we see with our eyes. The other is that our eyes are amazing in the details that they can see and how quickly they can adjust to see in the dark and light. Cameras can’t do that. They see only about half the contrast range that our eyes can see. By using the right exposure methods, we can get photos closer to what we see in the real world, but at some point an exact representation might not be the illusion that we as photographers are trying to create.
For this photo, I wanted the sky to be the color I saw. I wanted the sun to look as big as it seemed (to accomplish this I shot with a long lens). I wanted the valley to show. I also wanted the viewer to feel the depth and distance in the scene. Because a photo isn’t 3D that’s hard to do. Here the darker hill in the foreground contrasted with the brighter hill in the background makes it feel 3D. The processing allowed me to make the photo look like what I visualized in the field when shooting this. Without doing anything to the file after I shot, it was a failed picture.
Remaining Workshops for This Year
I have three spaces left in my Lake Superior Fall Photography Workshop and two spaces left in my Gales of November workshop. My Early Winter in the Badlands Photography Workshop is filling up.
 What I love about these three workshop is how much they vary from each other. The fall workshop is a 5-day workshop planned around peak color on the north shore. The extra length of the workshop allows me to plan in extra teaching sessions and a guest instructor, and the length allows for extra exploration and location shoots. For the participants the experience becomes more immersive. I talk about flow in my workshops. Flow is a concept of obtaining a state of mind that remains in the here and now. I believe you can obtain a flow mindset in photography and when you do, you release your imagination and create better photos. Five days of photography helps you to achieve flow. It doesn’t always happen, but I’ve seen people have more flow experiences and Aha! moments on the fall workshop than any of my other workshops.
 The Gales of November photo workshop is a blast, because instead of hoping for great weather we hope for the worst! We want strong NE or SW winds that drive massive waves up or down the lake. It’s planned on the statistically stormiest weekend of the year. While the huge waves don’t always show up, we usually have big waves. This is a blast of a workshop and will really push you outside your comfort zones if we get the awesome waves and bad weather.
 The best time of the year to be in the Badlands National Park is December! The sunrises and sunsets line up with the formations perfectly — better than any other month of the year. And because hardly anyone visits the park in December, the wildlife hangs out right next to the roads. I’ve seen more wildlife in the Badlands during the winter months than any other time of the year. Even in May, when the park is still quiet, there’s enough traffic that the wildlife hides and moves away from the road. While it can be cold in December in the Badlands, the average high is 39 and the workshop is planned for the beginning of the month. Last year, we had 50s and 60s during the workshop. It’s really an awesome time to be there.
Select May Images
Here are a few select images from May. I’ll post photos from out west in the mid-month newsletter.


– p.s. have you seen the Ghost Tree on Artist’s Point. There’s a picture of it above. It doesn’t always show up, but it did on the waterfall photo workshop.
Leave a Reply